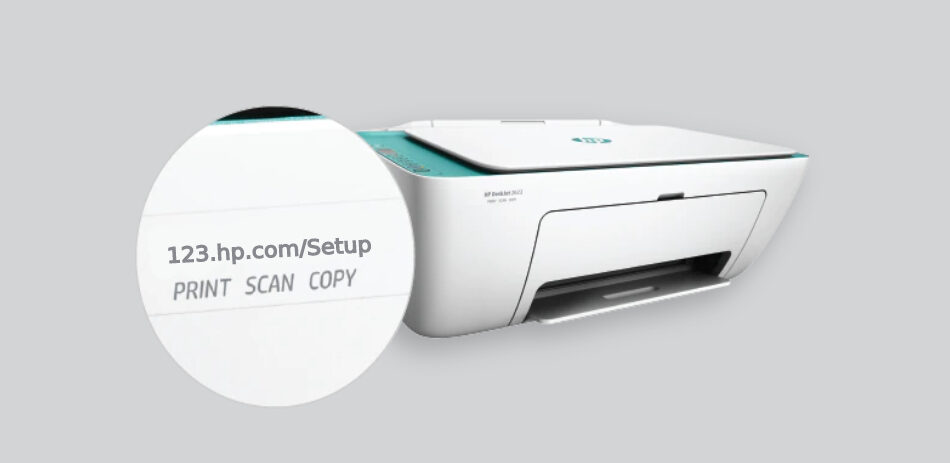
Begin by installing your new HP Officejet and downloading the most recent driver. 123 HP Setup and driver setup instructions are available at hp.com/123 Installing the printer software from HP on the device allows it to connect to a wireless connection and print indefinitely. You may use the compatible HP Printer Driver to print, copy, scan, fax, MobilePrint, cloud print, AirPrint, and many more Smart device printing functions. To finish the printer installation, read the 123 HP Printer Setup Guide. If you have any more questions or concerns, please contact us at our toll-free number. Our professional will provide you with a speedy printer installation solution.
In This Article
- 1 How to Install an HP Officejet Printer
- 2 Hp.com/123 Setup Printer Support from the Beginning
- 3 Simple 123.hp/setup Printer and Installation in 10 Steps for Beginners
- 4 Printer Connection
- 5 Hp.com/123 Configuration of the Connection Utilising a USB Cable
- 6 Configuration of the Connection Making Use of Ethernet
- 7 Configuration of a Wireless Connection
- 8 123.HP/SETUP Driver Download
- 9 123.hp.com – 123 HP Setup Printer Installation
- 10 Step 1: Take your HP printer out of its packaging.
- 11 Step 2: Get and Install the HP Printer Driver
- 12 Step 3: Connecting an HP Printer to WiFi
- 13 123.hp.com – HP Printer Installation
- 14 123.hp.com – Download and Install Drivers
- 15 Hp.com/123 Driver Installation Instructions
- 16 HP Software Installation 123
- 17 Wireless Configuration Assistant
- 18 Wi-Fi Security Configuration (WPS)
- 19 Services for printers
- 20 How to Fix Printer Offline Using Print and Scan Doctor
- 21 Installing Printer Drivers
- 22 Hp.com/123 Driver Download for Mac
How to Install an HP Officejet Printer
To begin, search for the requirements listed underneath to install the HP OfficeJet Printer Setup on Mac. The HP OfficeJet printer, USB cable, and the computer’s USB printer cable must all be present. Get HP Easy Start from 123.hp.com setup right now. Following that, enter the printer model code, verify the operating system, and install the HP OfficeJet printer software. On the Mac machine, choose USB as the link type. Next, ensure that the HP Scan option is chosen from the Install menu. If you wish to add a printer, choose the printer name and click the Use Print button. Then, from the pop-up menu, select Add. Finally, return to your HP installer to finish the installation.
Hp.com/123 Setup Printer Support from the Beginning
Hp.com/123 Printers are the fully–featured solution for both workplace and home use. If you use HP printers, you should be aware of the benefits of such a sophisticated printer. New customers who have purchased a new contemporary HP printer will require setup assistance. The HP printer is incredibly straightforward to set up. On this page, you will find detailed information about 123 HP Setup.
Simple 123.hp/setup Printer and Installation in 10 Steps for Beginners
- First, take your HP printer out of the box.
- Remove all of the tapes and packaging material. Examine the interior of your printer for tapes that are sealing the pieces together.
- Now connect your printer’s power cord to a functional power outlet. When you press the power button , your printer will begin to blink.
- Next, navigate to the printer’s screen and configure the language, date, region, and other options as requested.
- Remove the original ink cartridge from the HP printer. Open the cartridge door and arrange each ink in its proper spot.
- If you are unsure how and where to insert the ink cartridges, you can get assistance from the manual.
- Close the door and check the screen for the message.
- Take enough A4 printing sheets and place them in the input tray.
- Both sheets and ink cartridges will be aligned by your printer.
It will now request the connection.
Printer Connection
Let us now go on to connect your HP printers to the network. You can select one of three choices.
- USB Printing Configuration
- Wireless Network Configuration First-time printer setup
- Ethernet Connection
Hp.com/123 Configuration of the Connection Utilising a USB Cable

- USB connection ports are provided for plugging in a USB cable or an Ethernet cable into your laptop or network router.
- The majority of the PCs are linked to a wired connection through a single built-in Ethernet connector.
- The USB and Ethernet cords are not the same as the ones you use to connect your phone.
- Insert one USB cable port into your printer and another into your PC.
- Follow the on-screen prompts to install the HP printer software.
Configuration of the Connection Making Use of Ethernet
- First, make sure you have an Ethernet connection that is compatible with your printer model.
- During the installation, be sure you pick Wired Connection or Ethernet as the connection type.
- So you’ll need a router immediately.
- If the router does not have any free Ethernet ports, a switching or hub with accessible Ethernet ports is necessary.
- Connect the printer and router’s Ethernet ports.
- The link between your printer and internet router will be established.
Configuration of a Wireless Connection
- On your printer, press the wifi button.
- The blue light will indicate that it is turned on. Now, on the printer’s interface, press Settings.
- Next, pick Wireless Setup Wizard and click Yes.
- You must follow the on-screen instructions.
- The printer will recognize the router’s accessible networks.
- Choose your network from the list and input the network password to connect.
- Confirm the wireless setup by following the on-screen directions.
123.HP/SETUP Driver Download
To use your printer and get prints in your tray, you must have drivers and software installed on your computer. Drivers enable printing and deliver printing commands to printers. Let’s get started:
- Turn on your printer and computer.
- Now launch your browser and navigate to 123.hp.com/setup.
- Choose your computer system and the appropriate drivers for your printer model.
- To finish the installation, click Download and then follow the on-screen directions.
- You may find it in the installation directory once the download is complete.
- Now you must install the HP Printer driver and software, but first confirm that the printer is linked to the computer.
- Run the setup after opening the setup file in the Downloads folder.
- Now, select the Install option and begin the installation; follow the on-screen directions to finish the setup.
123.hp.com – 123 HP Setup Printer Installation
123.hp.com provides the printer handbook for configuring the 123 HP Printer. The 123 HP printer setup instructions for Deskjet, Envy, Officejet, and Oj Pro models. The first stage after purchasing a new printer is to install and configure it.
Get the entire procedure for 123.hp.com printer installation right here.
- The basic 123 HP Printer Setup comprises unpacking and preparing the printer for software installation, as described at 123.hp/setup.
- Installing the most latest and appropriate printer software and drivers from 123.hp.com is the purpose of the 123 HP Driver software.
Step 1: Take your HP printer out of its packaging.

- Remove the HP 123 printer from its packaging.
- Remove all packaging from the HP printer and its attachments.
- The essential phases of software and hardware printer setup are covered at 123.hp.com/setup.
- Place the printer in a flat area close to an electrical outlet.
- Using our instructions, get the latest version from 123.hp/setup for Windows and MAC OS.
- With the driver and software, you can now fully utilize the 123 HP Printer connection capability.
Do you still have problems with any of the 123HP Printer Setup steps? Contact us through our toll-free phone or live chat.
Step 2: Get and Install the HP Printer Driver

- The 123 HP com Printer works with both Mac and Windows systems.
- Find the most recent version of the HP Printer driver for your PC at 123.hp.com.
- Select the HP Printer Software that is appropriate for your operating system.
- Now, go to 123.hp.com and install the 123 HP com Setup Printer Driver.
- Run the software file for the driver and software after completing the 123 hp driver download process.
Step 3: Connecting an HP Printer to WiFi

- To begin, go to 123.hp.com and download and install the most recent and appropriate 123 HP Printer software.
- On your device, go to settings and then wifi settings.
- Follow the onscreen instructions after selecting Wireless Setup Wizard.
- Enter the router’s password and username and wait for the wireless connection to establish.
- Ascertain that both the PC and the 123 hp printer are connected to the same wifi network.
123.hp.com – HP Printer Installation
123 HP Printer Setup for the First Time
Unpacking is the first step in the HP Printer’s first-time setup. Follow the setup instructions for your first printer.
- To begin, remove the new HP printer from its packaging and position it in an appropriate location.
- Then, remove any packing tapes and materials from the 123 hp printer.
- You may now connect the new HP Officejet to the wall outlet using a secure connection.
- Turn on the Hp deskjet and wait for it to settle idle.
- Install the cartridge and load paper to prepare the printer for software installation.
- Then, link the HP printer to your home or office network as well as the devices.
- Install the 123.hp.com software and drivers that are compatible with your Windows or MAC machine.
Steps should be taken:
- We recommend that you use the USB for the first time you set up your 123 HP Setup printer.
- Download the most current edition of HP printer drivers. The most recent version of the HP printer driver generally enables all 123 HP capabilities and improves printer performance. The most recent version of HP printer drivers & software may be downloaded from the driver website.
123.hp.com – Download and Install Drivers
You may get the software at 123.hp.com and install it. If you have the CD, you may use it to complete the initial setup process. To obtain the drivers and software, follow the HP printer driver installation guide.
Option 1: Install HP printer drivers from a CD

- Put the HP printer driver installation CD into the slot and follow the wizard instructions.
- Then, for the HP Printer Driver installation, follow the wizard’s instructions.
- During the procedure, the wizard requests the type of connection between the devices.
- Go to the driver/software screen after selecting the network option (wired/wireless).
- Choose the HP Printer drivers that are compatible from the list.
- Finally, download the HP Printer software and drivers.
Option 2: Download and install the HP Printer drivers

- To begin, go to the software download page and input your 123 HP printer model number.
- Then, wait for it to recognize your computer’s operating system version and provide a list of HP printer adapters and software.
- Now, select the drivers from the 123.hp.com list and reinstall your computer according to the instructions.
Hp.com/123 Driver Installation Instructions
123 HP Wireless Printer Configuration
You may configure the fresh new HP printer to connect wirelessly. This needs the Wifi network information as well as the Wireless Setup software. Here are the simple steps for finishing the HP printer wifi setup process.
- To begin, examine the security of your home or business WiFi connection.
- After that, install the HP wireless printer software and run the Wireless Setup Wizard.
- Navigate to the Network Settings option on your printer’s touch screen.
- Follow the on-screen instructions, and the HP printer will display the wireless networks in the area.
- Then, select your Wireless internet name and enter your password to obtain access.
- If your HP printer lacks a touch screen, use the USB Cable to establish a temporary connection.
- Then, on your computer, launch the HP Printer Wireless Setup Wizard and link it to your wireless network.
Steps should be taken:
- If your WiFi password is not on the list, you may manually enter it using the options available.
- When you switch on the 123 HP printer, you may now enable the 123 HP Auto Wireless Connect.
HP Software Installation 123
In the tiny printer, 123 HP now provides a variety of functions. You may enable these functionalities with a single click and enjoy limitless wireless printing. To activate these capabilities, you may need to use the most current and appropriate 123 HP printer software. To fully utilize the printing and connection functionalities, follow the HP Driver installation instructions.
- To install the 123 HP Printer software from 123.hp.com, you must first know your computer’s operating system version and the printer model number.
- Wait for the hp.com/123 website to detect your computer’s operating system version.
- It now displays all of the 123 HP printer software that is available for your Windows or MAC computer.
- You may choose a certain set of 123 HP printer drivers and software based on the feature and function.
- Now, save the printer driver from HP to your computer and launch the installer to begin the installation procedure.
- Then, follow the installation procedure instructions on the screen to finish installing the HP Printer Software.
We recommend that you contact us if you need help finding or installing the correct HP printer drivers and software for your computer. We help you with the entire HP printer setup procedure and problems from 123.hp.com/setup.
Wireless Configuration Assistant
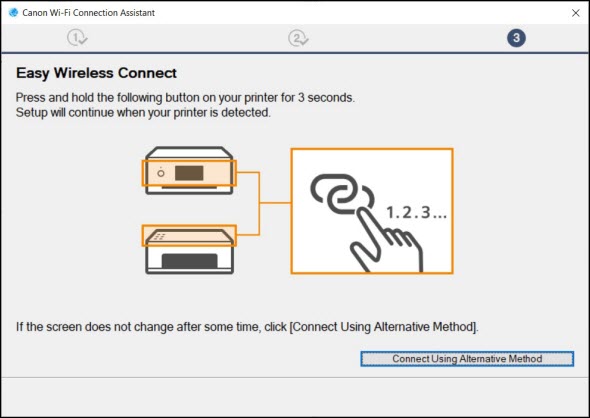
The Wireless Installation Wizard connects your printer to your Wi-Fi network at home or at work. It is only accessible on certain printer models that include a touch control panel. Connecting your printer to the internet serves as a prerequisite for obtaining and installing the software driver and setup.
If you’re sick of entering passwords, you may utilise the WPS technique to connect to the web (Wi-Fi Protected Setup). The WPS technique, like the Wireless Setup Wizard, is only accessible in a subset of printers.
Make sure you have the following items before beginning the procedure.
- Network Name (SSID) Wireless Printer Networks Password (WEP or WPA passphrase)
- Wireless-capable system.
- Activate your computer, network, and printer. Connect your computer to the same network as the printer you wish to connect to.
- Remove all USB and Ethernet cords. Navigate to the printer’s control panel and choose setup, network, or wireless.
- To finalise your printer’s network connection, follow the Wireless Setup Wizard’s on-screen instructions.
Passwords are case-sensitive, so use caution while entering them for your Wireless Network. When you connect your printer to the internet, the Wireless light stops flickering and becomes constant.
Wi-Fi Security Configuration (WPS)

WPS (Wi-Fi Protected Setup) links your printer to the internet without requiring a password. This approach is only suggested if your router is WPA-secured. If it is encrypted using WEP or another means, you should connect your printer using the Wireless Setup Wizard.
To connect your printer, you can choose between the Push button approach or the Pin method. The push button approach is simpler and more popular than the PIN method. To connect your printers to the internet using WPS, follow the instructions outlined below.
Method of the Push Button:
- Some printers prompt you to select WPS or Wireless Setup Wizard. In such a scenario, use WPS and the Push Button approach.
- Wait three seconds after pressing and holding the WPS button on your router for the printer to join the network.
If your printer is successfully connected to the internet, the Wireless light on the printer will stop flickering and become stable.
PIN System:
- When prompted to choose between the push button technique and the PIN method, select the PIN option from the WPS menu.
- The PIN that you must enter will be shown on your printer’s control panel.
- Enter the WPS pin into your router’s utility page.
The Wireless light stops blinking after the printer is securely connected to the internet.
Services for printers

Our Printer Technical Support staff is made up of professionals who can troubleshoot a wide range of Printer difficulties. If you were unable to resolve the difficulties by following the methods outlined here, please contact us for further assistance.
Print and Scan Doctor assists with resolving the most frequent printing and scanning issues, such as connection issues, firewall issues, and printer troubleshooting issues.
- Print and Scan Doctor may be downloaded from the printer support page.
- To complete the installation, open the downloaded file and follow the on-screen instructions.
- When you launch the tool, a list of all Printers appears.
- Choose your printer and press the repair button. Depending on the problem, you can either print or scan.
- A green tick mark shows if no problems were discovered.
- A wrench displays if Print and Scan Doctor were used to address the issues.
- An exclamation mark displays if the test needed any user activity and it was not delivered.
- If Print and Scan Doctor is unable to resolve the problem, a red X sign displays to signal a problem.
Check to see if the software drivers were properly installed.
How to Fix Printer Offline Using Print and Scan Doctor

- Prints and Scan Doctor may be downloaded from the support page.
- To complete the installation, open the downloaded file and follow the on-screen instructions.
- When you launch the tool, a list of all Printers appears.
- If your printer is not detected, hit Retry to restart the search.
- If the Print and Scan Doctor indicates that the software drivers need to be upgraded, click Yes to proceed.
- The Printer Offline error might also occur if your printer is not set as the printer software. Making your printer the default printer will solve the problem.
If none of the following methods work, go to our website and look at the troubleshooting instructions for each specific printer by clicking on the series and then choosing your model number. Alternatively, you may inspect your Wireless connection for any issues.
Installing Printer Drivers
All printers come with an installation CD including the printer software driver. You may, however, obtain and install the driver software for your printer.
The Driver Installation method is nearly identical for printers with and without displays. However, if you want more thorough instructions on printer installation, you may visit the pages relevant to your printer.
- Turn on both your printer and PC.
- Check that they are both linked to the same wireless connection (Applicable for wirelessly enabled printers)
- Next, launch your preferred browser on your PC.
- Enter the name and model number of your printer. For instance, the Officejet 3830. The name make and model of your printer may be found on the right side of the printer.
- Wait for the program to download after clicking the Download button.
- When the download is finished, double-click it to open it.
- If your system prompts you to authorize Easy Start Utility can make modifications to the system, select Yes to allow it to do so.
Hp.com/123 Driver Download for Mac

To begin, go to 123.hp.com/setup and install the HP Deskjet printer driver by inputting the HP DeskJet printer code generator. Prior to that, navigate to the Downloads section of HP Software and Driver. Now, select the most recent operating system. Select the Mac version of the OS first, then hit the Start button. The Driver file will begin to download and will now choose the link type as USB. Installation of the HP Scan in the same way. Second, click the printer’s name, followed by the option Add. Finally, return to your HP installer to finish the installation.


